Technical documentation
发布日期:2022-05-06 浏览次数:2313 来源:杨广成
思科NAT与PAT转换配置实例与演示-EI CCNA基础知识文档
文档提供:WOLFLAB 杨广成 CCIE#29957;HCIE#12877
关注WOLFLAB网络实验室,我们定期更新技术文档、视频等学习资料
加网站官方客服,获取EI CCNA全套学习视频,QQ:2569790740

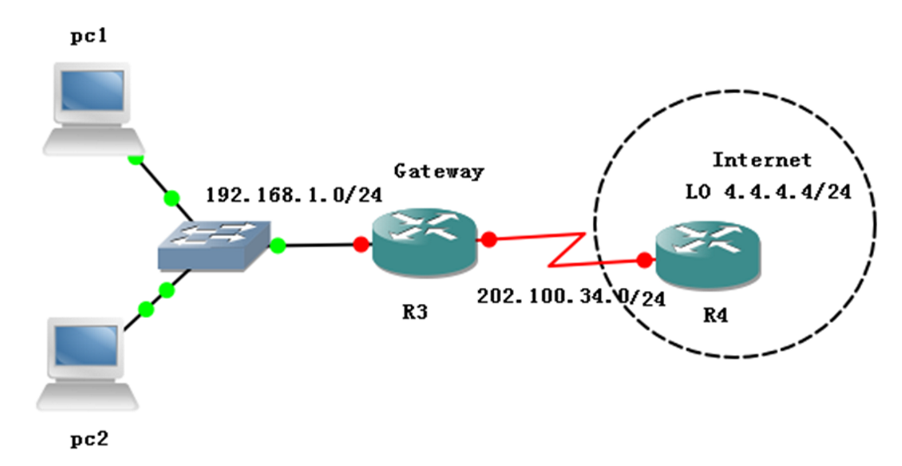
1. 如图所示,在GNS3上搭建实验环境,配置接口ip地址。
R1: interface FastEthernet0/0 no shutdown ip address 192.168.1.1 255.255.255.0 no ip routing //关闭其路由功能,模拟一台主机 hostname pc1 ip default-gateway 192.168.1.3 //网关指向R3 R2: interface FastEthernet0/0 no shutdown ip address 192.168.1.2 255.255.255.0 no ip routing //关闭其路由功能,模拟一台主机 hostname pc2 ip default-gateway 192.168.1.3 //网关指向R3 R3: interface FastEthernet0/0 no shutdown ip address 192.168.1.3 255.255.255.0 interface Serial1/0 no shutdown ip address 202.100.34.3 255.255.255.0 R4: interface Serial1/0 no shutdown ip address 202.100.34.4 255.255.255.0 interface Loopback0 ip address 4.4.4.4 255.255.255.0 |
2. 在R3上配置一条默认路由,指向R4。此时在pc1和pc2上ping 4.4.4.4,是否可以通?
R3: ip route 0.0.0.0 0.0.0.0 202.100.34.4 //此时在pc1和pc2上ping 4.4.4.4是不通的。 |
3. 在R3上做静态一对一的NAT转换,将pc1的地址转换成202.100.34.100,将pc2的地址转换成202.100.34.101,转换完成后,在pc1 pc2上ping 4.4.4.4。
R3: 配置步骤: 1、确定ip nat的内部、外部; 2、将私网ip与公网ip做关联。
interface FastEthernet0/0 ip nat inside interface Serial1/0 ip nat outside
ip nat inside source static 192.168.1.1 202.100.34.100 ip nat inside source static 192.168.1.2 202.100.34.101 R3#show ip nat translations //查看NAT的转换表项 |
4. 将R3上静态一对一的NAT转换命令删除。配置R3上做动态一对一的NAT转换,公网地址池的范围为202.100.34.80 --- 202.100.34.90,配置感兴趣流ACL,只针对192.168.1.1 --- 192.168.1.127范围的地址做转换。配置完成后,在pc1 pc2上ping 4.4.4.4进行测试。
R3: no ip nat inside source static 192.168.1.1 202.100.34.100 no ip nat inside source static 192.168.1.2 202.100.34.101 配置步骤: 1、确定ip nat的内部、外部; 2、确定感兴趣流的ACL;(需要转换的私网ip地址) 192.168.1.1 --- 192.168.1.127 3、确定公网地址池Pool池; 4、将感兴趣流的ACL与Pool池做关联。 interface FastEthernet0/0 ip nat inside interface Serial1/0 ip nat outside access-list 1 permit 192.168.1.0 0.0.0.127 //感兴趣流的ACL ip nat pool WOLF 202.100.34.80 202.100.34.90 netmask 255.255.255.0 ip nat inside source list 1 pool WOLF
R3#show ip nat translations //查看NAT的转换表项 |
5. 将pc1的ip地址改为192.168.1.85,pc2的ip地址改为192.168.1.88。针对R3上动态一对一的NAT转换,实现转换前与转换后主机位保持不变。
Pc1: interface FastEthernet0/0 ip address 192.168.1.85 255.255.255.0 Pc2: interface FastEthernet0/0 ip address 192.168.1.88 255.255.255.0
clear ip nat translation * //先清空nat的转换表项,才可以no掉pool池。 no ip nat pool WOLF 202.100.34.80 202.100.34.90 netmask 255.255.255.0 ip nat pool WOLF 202.100.34.80 202.100.34.90 netmask 255.255.255.0 type match-host ip nat inside source list 1 pool WOLF
R3#show ip nat translations //查看转换表项,转换前后主机位不变 Pro Inside global Inside local Outside local Outside global --- 202.100.34.85 192.168.1.85 --- --- --- 202.100.34.88 192.168.1.88 --- --- |
6. 将R3上动态一对一的NAT转换命令删除。配置R3多对一转换,配置完成后,在pc1 pc2上ping 4.4.4.4进行测试。
R3: no ip nat pool WOLF 202.100.34.80 202.100.34.90 netmask 255.255.255.0 type match-host no ip nat inside source list 1 pool WOLF 配置步骤: 1、确定ip nat的内部、外部; 2、确定感兴趣流的ACL;(需要转换的私网ip地址) 3、将感兴趣流的ACL与Outside接口做关联。 //ip nat的内部、外部;感兴趣流的ACL在前面的需求中已配置完成。
ip nat inside source list 1 interface Serial1/0 overload
R3#show ip nat translations //查看NAT的转换表项 Pro Inside global Inside local Outside local Outside global icmp 202.100.34.3:7 192.168.1.85:7 4.4.4.4:7 4.4.4.4:7 icmp 202.100.34.3:8 192.168.1.88:8 4.4.4.4:8 4.4.4.4:8 |
7. 将R3上多对一的NAT转换命令删除。假设内网中主机很多,需要做多对少,公网地址池有2个ip地址202.100.34.100---202.100.34.101,配置R3多对少转换,配置完成后,在pc1 pc2上ping 4.4.4.4进行测试。
R3: no ip nat inside source list 1 interface Serial1/0 overload no ip nat inside source list 1 pool WOLF
配置步骤: 1、确定ip nat的内部、外部; 2、确定感兴趣流的ACL;(需要转换的私网ip地址) 3、确定公司地址池Pool池; 4、将感兴趣流的ACL与Pool池做关联 + overload。
access-list 1 permit 192.168.1.0 0.0.0.127 //感兴趣流的ACL ip nat pool WOLF 202.100.34.100 202.100.34.101 netmask 255.255.255.0 ip nat inside source list 1 pool WOLF overload
R3#show ip nat translations //查看NAT的转换表项 |
8. 将pc1的23端口映射为公网地址202.100.34.200的10001端口,实现在R4上通过访问202.100.34.200的10001端口至pc1上。
R1: line vty 0 1869 no login
R3: ip nat inside source static tcp 192.168.9.85 23 202.100.34.200 10001 extendable
R4#telnet 202.100.34.200 10001 //后面记得设置端口号,默认是23端口 Trying 202.100.34.200, 10001 ... Open R1> |
9. 将R3---R4之间的链路封装为PPP,并开启双向PAP认证。
R3 R4: interface Serial1/0 encapsulation ppp
R3: username CCNA password CCNA interface Serial1/0 ppp authentication pap ppp pap sent-username CCNP password CCNP
R4: username CCNP password CCNP interface Serial1/0 ppp authentication pap ppp pap sent-username CCNA password CCNA |
10. 将R3---R4之间的PPP链路配置为Chap认证,并删除接口产生的/32路由。
R3 R4: interface Serial1/0 no peer neighbor-route
R3: username R4 password cisco interface Serial1/0 ppp authentication chap
R4: username R3 password cisco interface Serial1/0 ppp authentication chap |
欢迎关注WOLF-LAB沃尔夫网络实验室:
我们会陆续更新EI CCNA,CCNP,EI CCIE;HCIA,HCIP,HCIE Datacom等学习视频,IT技术,学习技巧等
视频转码、资料等问题,可联系WOLF-LAB(沃尔夫)实验室进行更新!